Showing posts with label SoftwareTool. Show all posts

Thursday, July 25, 2019

Low Orbit Ion Cannon


“Hacktivist” group Anonymous’s original tool of choice – LowOrbit Ion Cannon (LOIC) 


Operating system: Windows, Linux, OS X, Android, iOS
Stable release: 1.0.8 / 13 Dec 2014;
Size: 131 KB
Original author(s): Praetox Technologies
Platforms: .NET Framework, Mono
Written in: C#, C++

Download  is a simple flooding tool, able to generate
massive amounts of TCP, UDP, or HTTP traffic in order to subject a
server to a heavy network load. While LOIC’s original developers,
Praetox Technologies, intended the tool to be used by developers who
wanted to subject their own servers to such a heavy network traffic
load for testing purposes, Anonymous picked up the open-source tool
and began using it to launch coordinated DDoS attacks.
Soon afterwards, LOIC was modified and given its “Hivemind”
feature, allowing any LOIC user to point his or her copy of LOIC
at an IRC server, transferring control of it to a master user who
38can then send commands over IRC to every connected LOIC client
simultaneously. In this configuration, users are able to launch much
more effective DDoS attacks than those of a group of less-coordinated
LOIC users not operating simultaneously. In late 2011, however,
Anonymous began to step away from LOIC as their DDoS tool of
choice, as LOIC makes no effort to obscure its users’ IP addresses.
This lack of anonymity resulted in the arrest of various users
around the world for participating in LOIC attacks, and Anonymous
broadcasting a clear message across all of its IRC channels: “Do NOT
use LOIC.”

Tuesday, July 23, 2019

Reconnoitre – A Multithreaded Enumeration Tool


  • Reconnoitre is a tool that was created to automate routine actions 

  • within the OSCP lab environment. It is a simple script, which can automate information gathering and service enumeration. It searches for the live hosts, and performs a scan on the hosts that are found, enumerates its detected services and sends commands to it. The tool can discover virtual hosts running on the targeted system. The information is stored methodically by creating a directory like structure to store the findings, results, and methodologies used for each host, recommended commands to execute and the directory structures for storing loot and flags.


Downloading and Installing Reconnoitre

It can be downloaded in the Kali Linux with the following command;
git clone https://github.com/codingo/Reconnoitre.git


Once the download completes, make sure you have python3 installed as it is a pre-requisite for the installation. You need to navigate to its downloaded directory and install it using the command given below;
python3 setup.py install

                                                     Running Reconnoitre

We will first look for the help file;
reconnoitre -h


You can see that it is a simplified tool with many awesome functions. In this example, we will use some basic options, like starting with the service enumeration and saving the result in a directory with them. Start the quick service enumeration scan with;
reconnoitre -t <IP ADDRESS> --services --quick -o /root


                                                                                                                                    The result can be seen from the directory which was mentioned in the -o argument;
The above performed a quick scan on the target and provided numerous useful results in an easily readable format, now scan for the target’s hostname;

Saturday, July 20, 2019

How To Install and Use Photon – A Very Handy Open Source OSINT Tool

Installing Photon

It’s fairly easy to install Photon all you have to do is clone the Github repository from here, install the dependencies, and run the script.
git clone https://github.com/s0md3v/photon.git

Installing Dependencies

Installing dependencies in Python is pretty easy, most developers place a requirements.txt file along with their package which has a list of all the dependencies with the specific version being used in the script. So time to CD into the cloned repository and install the dependencies.
cd Photon
python3 -m pip install -r requirements.txt
Here we call the python3 binary and run the module pip which is a package manager for Python through command line. Later we pass the flag -r to PIP for passing a list of requirements in it. PIP will go line by line and install all the packages required. I already have the packages installed so this is what I get, your output may differ.


PIP output

Photon in action

Now that are environment is all setup it’s time to startup Photon.
python3 photon.py
If everything went well this is the output you’ll get.


Photon output

As you can see Photon offers a lot of options for you to play with. You can crawl a single website, clone the website, set link depth, specify user agents, and obviously a Lot more.

Crawling a Website

We’re going to start simple and crawl a single website right now.
python3 photon.py  -u "https://llamasec.tk"


Photon in action

Note - Do NOT run your scans on llamasec unless authorized to do so.
The output gets stored in llamasec directory with a file called internal.txt. There isn’t much there but then again the website is quite static. Let’s try something which is more dynamic with extra set of options this time.

Photon with Options

Tesla has an open bug bounty program so we’re going to scan them for now.
python3 photon.py -u "https://www.tesla.com/" -l 1 -t 10 -o sorryElon --dns
Here we ask Photon to scan Tesla, with a dept scan level 1 and 10 threads, also we’re specifying the output directory to sorryElon, with DNS mapping as well.
This time Photon will scan for multiple javascript files and store it in the output along with a list of all the subdomains associated with that domain. One thing to note here is that the scan timing was pretty quick and much better than other tools. S0md3v also went the extra mile to add a visual DNS map which is a great touch.

SSLyze: A Python Tool For Analyzing SSL Configurations

Key features include:
  • Multi-processed and multi-threaded scanning (it’s fast)
  • SSL 2.0/3.0 and TLS 1.0/1.1/1.2 compatibility
  • Performance testing: session resumption and TLS tickets support
  • Security testing: weak cipher suites, insecure renegotiation, CRIME, Heartbleed and more
  • Server certificate validation and revocation checking through OCSP stapling
  • Support for StartTLS handshakes on SMTP, XMPP, LDAP, POP, IMAP, RDP and FTP
  • Support for client certificates when scanning servers that perform mutual authentication
  • XML output to further process the scan results
Source: https://github.com/iSECPartners/sslyze
  • Author: iSECPartners
  • License: GPLv2
Let’s get started.
First, we need to install SSLyze. Before installing SSLyze, we need to install python setuptools using the following command:
pip install --upgrade setuptools

Then we install SSLyze using the following command:
pip install --upgrade sslyze

Then when the installation is completed, you shall see a screen similar to this:


At this level, you managed to successfully install sslyze.
Now, let’s use the tool and find out what it can really do.
To start SSLyze and go to the help menu, simple type the following command:
sslyze -h

To extract the configuration of a particular website, type the following command:
sslyze –-regular www.yahoo.com


(Here, we took www.yahoo.com as an example, you can replace it with any website of your choice)
Your screen should look like that (if you used www.yahoo.com):
You can scroll down your terminal to see what information the tool has extracted.
You can also go back to the help menu and utilize the commands available until you get what you want.

Cl0neMast3r – Install Your Hacking Tools With Ease

Getting Started

First, we have to install the tool on our machine using the following command:
git clone https://github.com/Abdulraheem30042/Cl0neMast3r.git
Then we change directory to Cl0neMast3r by typing the following command:
cd Cl0neMast3r/
We find out that there are some requirements that need to be installed, so we execute the following command:
pip install -r requirements.txt
You should see something similar to the above screenshot when you successfully install the requirements.
Before starting the tool, we may need to change permission of the file by typing the following command:
chmod +x Cl0neMast3r.py
Then we start the tools by typing the following command:
python Cl0neMast3r.py
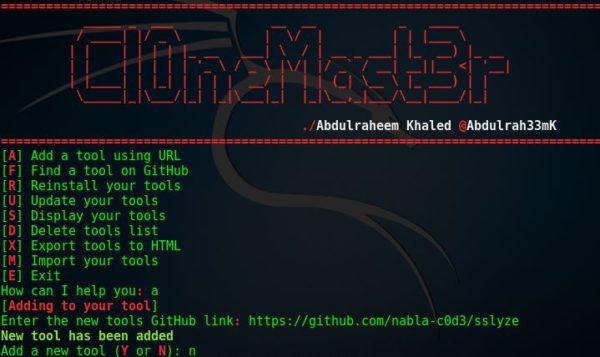
When the tool starts, your screen should look like the following:

We can see that it gives us various options such as adding a tool, find a tool among others.
We can start with adding a tool.  In a previous post, I talked about SSLyze tool. Let’s say that we wanted to add the tool to our penetration testing tools.
Whilst Cl0neMast3r is running, to add the tool, we type
a
The tool asks us to provide the GitHub link of the SSLyze tool.
Then we enter the following link:
https://github.com/nabla-c0d3/sslyze
Then tool asks us if we want to add a new tool, if you want to add a new tool, you can type:
y
I don’t want to add a new tool, so I typed:
n
When the tool is successfully added, you should see the following message:
Then you type:
m
To return to the main page when asked by the tool.
As a verification measure, we want to make sure that the tool has been successfully added. So we type:
s
To display the list of our tools
If you successfully installed SSLyze, you should be able to see it in your list.
Your screen should look like the following:

Then you can return to the main menu and utilize other options that the application offers.
In conclusion, as a penetration tester, you should have a toolbox to work with whilst conducting your ethical hacking assignment. This will help you to better scan, identify vulnerabilities and extract information during your engagement.

Spaghetti – An Open Source Web Application Security Scanner

Some of its features include:
  • Fingerprinting (Server and Web Frameworks (CakePHP,CherryPy,…)
  • Discovery: (Bruteforce, Admin Interface, Common Backdoors)
  • Disclosure: (Emails, Private IPs)
  • Attacks: (HTML Injection, SQL Injection)

Getting Started


First, we have to clone the tool by typing the following command:
git clone https://github.com/cyberheartmi9/spaghetti.git
The once cloned, we change directory by typing the following command:
cd Security_Spaghetti
Then we install the requirements by typing the following command
pip install -r requirements.txt
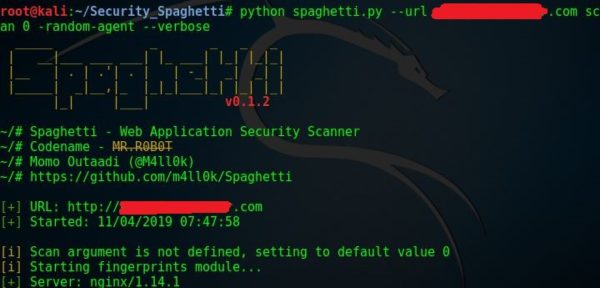
Then we start spaghetti by typing the following command:
python spaghetti.py
Then to use the tool against your target website, type the following command:
python spaghetti --url [here type a url of your choice] --scan 0 --random-agent –verbose

[Type the URL for which your client has given permission to pen test].